"The grass withers, the flower fades, But the word of our God stands forever." Isaiah 40:8

Thursday 10 December 2015

Teacher's Gifts

I think it is nice to give something back to my children's school teachers at the end of the year, after all, they have put up with my kids for a whole year!

Last year I made triangular gift boxes (see my posts here and here). This year, I've made some simple boxes and filled them with some treats.

The image is a digi stamp from PowerPoppy Partridge in a Pear Tree coloured with Copic markers. The sentiment is from AnnaBelle Stamps Holly Branch. The DP I've used is A Traditional Christmas from Michele R Designs and the edges have been inked using Distress Ink Pine Needles. Cardstock I've used is from Bazzill.


This is the other type of box I made. One of my girls has two part time teachers and the other one has two teachers. We also made one for their principal since they will be moving schools next year, so I made 5 gift boxes in total :-)

Elizabeth Whisson, Mo Manning, Teacher's gifts, Cats in the Christmas tree, Power Poppy, Partridge in a pear tree, christmas, Copic
This image is a digi stamp from Mo Manning Cats in the Christmas Tree and the DP is again from Michele R Designs A Traditional Christmas. The sentiment is a rubber stamp from Whimsy Stamps. The edges have been inked using Distress Ink Festive Berries. 

For Copics colours used on these images please see this post.

For step by step pictures on how I made the boxes please see this post.

Thanks for looking!

Copic colouring

I've made these gift boxes for my children's teachers. Here are the Copic colours I used to colour the images.

Image No.1: Power Poppy digi stamp "Partridge in a Pear Tree"


The branches have been coloured using E31, E35 and E25.
Foliage has been coloured using YG61 and YG67.
The "nuts" have been coloured using E31 and E 35. The partidge's beak is E97.
The inside of the pear was coloured using Y11 and YG21

Image No. 2: Mo Manning digi stamp Cats in the Christmas Tree
Not sure why this image insists on being upside down.... but I've used G24 and G28 for greenery.
 

The star also uses these colours.
In case you can't quite see, inside the cat's ears are R20.
I then used N7, N4 and N1 for shadows on the ground.

For step by step instructions on how I made the gift boxes please see this post.

Thanks for looking!

Teacher's Gift Boxes - step by step

Please see my other post for some pictures of the finished gift boxes. Below are some step by step photos of how I made the boxes. (The photos are taken with my phone not my normal Digital SLR camera, so please excuse the quality!)

This gift box has a base of 2" x 5" and the sides are 3" high.


Step 1. Cut a piece of card (I've used smooth Bazzill) to 11" x 8". Scor at 3" and 8" along the 11" side.

Step 2. Turn your scored piece of card 90 degrees and scor at the 3" and 5" marks (along the 8" side).


Step 3. Cut along the red lines (see photo below) and then along the green lines. Discard the sections labelled "discard" and the small triangle pieces that you cut out. Scor along the remaining blue dashed lines.

You should end up with your piece looking like this.


Step 4. Cut some designer / patterned paper slightly smaller than the cardstock sections, ink the edges and adhere to base using double sided tape.


Step 5. Adhere any additional images / embellishments to the front panel. Then add some double sided tape to the tabs (I didn't want my boxes to fall apart, hence lots of tape :-) )

Step 6. Fold box and secure with the double sided tape.

And here is the finished product:


Please see this post for details on the Copic colours I used on my images.

Thanks for looking!

Birthday Wishes

I made this card for a friend's birthday.

Birthday Wishes, PowerPoppy, Elizabeth Whisson, Copic, Alshandra

I think this image is just gorgeous :-) It is Asters Abuzz digi stamp from Power Poppy. The sentiment "Birthday Wishes" is from AnnaBelle Stamps 'Flowers with Love'.

I have printed the digi image on X-Press It blending card and coloured with Copic markers.


Yellow flowers: YR15, YR18 and N4 for shadow with centres: E31, E25 and E49
Purple flowers: V000, V05, V09 and N4 for shadow
Pink flowers: RV63, RV66 and RV69
Green combination 1: YG61, YG63 and YG67
Green combination 2: G43 and G46
Bees: Y13 and 110 + C1 for wings and Stickles Star Dust

I have used orange Bazzill cardstock for the card base and the patterned paper is from DCWV Sweet Tangerine Stack. I've added some Sew Easy fancy floss Coral Reef (orange and white) and some 3 mm pumpkin sprinkles. The panels are inked using Distress Ink Carved Pumpkin (new in 2015).

Power Poppy's Power and Spark challenge over on their blog this month is "Rewind", which means you can choose any of the challenges they've had in 2015. I went with "embellish this" as I've used Stickles, sprinkles and twine/floss on my card.

Thanks for looking!

Wednesday 2 December 2015

Christmas is coming!

I can't believe that it's the second day of December already! I've managed to make a few Christmas cards, but still way behind, as usual! Here are a few:

This one uses Distress Stains Pine Needles, Bundled Sage and Crushed Olive. I've then stamped over the top using Our Daily Bread Designs Poinsettia Collage and Amazing Grace Sheet Music. Then I've used Our Daily Bread Designs The Babe as the main image and one of the sentiments from Our Daily Bread Designs Christmas Verses. 

I saw this technique on SCS here, and also visited the page she refers to here. I couldn't get the acrylic block technique to work at all (and couldn't be bothered trying to work it out, maybe it was the card I was using??) so I ended up masking off parts of my card and using Distress Stains. A note on the Distress Stains though - I did have to place some absorbent paper towel under my card so that when the ink runs to the left and right edges of the card it doesn't bleed underneath. Took me a few tries to get a completely "white" card interior but I got there in the end!


The next cards below are similar but I have used different stamps including ones from AnnaBelle Stamps (which are sadly no longer available).


I then found some more inspiration on Pinterest and made this next card (and a few others similar, not pictured here). See the pinterest link for details on how to make the tree, but I don't think it says how big a circle to start with. You can obviously make any size tree, but for mine I started with a circle of 5" in diameter. This will then make two trees about 3.5" tall. You can see that on this tree the bottom left and right points are fairly even, this is because I re-cut the bottom once it was folded. But if you leave it how it is, one end will be a little lower than the other.


More pinterest inspiration...these are just a really simple, fun little cards (they are half the size of the ones above).

Thanks so much for looking! 


~~ Please visit my facebook page to view cards I have for sale ~~

I'm back, again!

Well, since my last post I have been having some MAJOR computer problems! Not sure if they are completely fixed yet but fingers crossed it will behave for a while (if I disappear again, you know why)! In the meantime I have been making some cards and have been dying to share them with you.

This is one I just finished for one of my friends.

Elizabeth Whisson, Alshandra, Copic, Mo Manning, handdrawn background, Congratulations, mother to be, pregnant lady, baby, Copic colouring, copic sketch

The image is a digi stamp from Mo Manning and is called "Mother to be 1". The background I drew myself, but it was based on one of the past Create and Learn Monthly Project Colouring Classes from Kit and Clowder. I don't own this particular monthly class (although I highly recommend them (I have several others, including technique classes)) so I had to work out how to do the background myself (and obviously haven't done as good a job as I could've done if I had the class!) but I think it turned out pretty well considering.

I've used Copic markers to colour my image:
 Wall -  RV10
Panels, window frame and curtain rod - E40, E43 and W00
Shrub - G40, G82, G24, G28
Sky - B00
Curtains - BG000, BG10, BG11, BG13, BG15
Carpet/Floor - BG01, BG11, BG05, BG09, BG49
Skin - E000, E00, E21, E11, E04
Hair - E50, E31, E25, E29
Top - RV10, RV11, RV13, RV14, RV19, C3
Skirt - B00, B02, B04, C3

I am entering this card in the following challenges:

Thanks for looking.


~~ Like my cards? Please visit my facebook page to view cards I have for sale  ~~

Wednesday 28 October 2015

I'm back! and Brunswick Show 2015

Wow! I didn't expect to be away from my blog and cardmaking for that long - but I'm finally back! We have settled in to our new home and fantastic property. Loving the space and it's so much quieter out here than in the city :-)

I got stuck in to making some cards for the Brunswick Show 2015. I took out the "trophy" for the cardmaking section in 2014 (see this post) so I thought I'd have a go at entering my cards this year too - and I was stoked to find out how I did! Six 1sts, three 2nds and I won the "trophy" for both the stamping and non-stamping card sections!

My daughter also entered a few things again this year - she came 1st in the scrapbooking section for her age group!


Below are some of the cards that won prizes.


1st Place in Cardmaking for child with stamping
Image by Art by Mi Ran (Whimsy Stamps) - Sierra
Coloured with Copic markers.
This card is for sale on my facebook page.


2nd Place in Cardmaking for child with stamping
Image by Whimsy Stamps - Springtime
Coloured with Copic markers.
This card is for sale on my facebook page.

1st Place in cardmaking - black and white with stamping
Image by Saturated Canary - Charmings
Coloured with Copic markers
This card is for sale on my facebook page.

2nd Place in cardmaking - black and white with stamping
Image by PowerPoppy - Azalea
This card is for sale on my facebook page.

2nd Place in cardmaking for child with no stamping
This card is for sale on my facebook page.


I have created a facebook page called Alshandra's Corner - with some of my cards for sale. Please take a look!

Thanks for looking!

Tuesday 28 July 2015

ODBDSLC248 - Anything Goes with ODBD


Sadly, this will be my last ODBD challenge as a DT member :-( We've just bought a new house (which is very exciting! - MUCH bigger craft room and HUGE "backyard") but it means I have to step down from the ODBD challenge team DT, as I don't think I can make cards and move house at the same time!

I've loved been on the ODBD CT DT, my DT sisters (and ALL the breadsticks) are wonderful and soooo talented - I will miss you ladies! Chris - thank you for all your work as the team coordinator while I've been on the team and thanks Kelley for the wonderful ODBD products! I will continue to follow the new releases and drool over each one!

This will probably be my last post for a while too - until we get all settled in the new house but I will be back (hopefully sooner rather than later)!

So, here is my last ODBD CT card as a DT member:
Elizabeth Whisson, Our Daily Bread Designs, ODBD, ODBDDT, ODBDSLC248, Daffodil Corner, Flourished Star Pattern Dies, Good Man, doodlebug sprinkles, Copics, flowers, handmade card, Jeremiah 29:11

I've stamped Our Daily Bread Designs Daffodil Corner onto X-Press It blending card and coloured with Copic markers.

Copics Colours Used
Flowers: Y11, Y15, Y17, YR15, YR09
Leaves: YG91, YG95, YG99

I've then stamped the verse using Our Daily Bread Designs Good Man onto the top left of the white layer.

I've then diecut a yellow layer using ODBD Flourished Star Pattern Dies from Bazzill heavyweight cardstock.

Lastly I've added some Doodlebug Design Inc. Sprinkles - Summer Glitter Assortment. 

For more inspiration for this challenge please visit my talented design team sisters

To see all the projects created for ODBDSLC248 or to join the challenge click here. You have until 8 pm Sunday, 2 August 2015 EDT to join us (or 8 am Monday, 3 August 2015 AWST). By participating in the challenge, you have a chance to win a $15 ODBD Gift Certificate that can be used towards the purchase of stamps in the "stamps column" in the ODBD Store; or to be spotlighted on the ODBD Blog at our next challenge! The random prize winner will be posted on our next challenge post.

 I love this verse that I've used on my card - it reminds me that God has everything in control and can see the "big picture" in our lives. As we move house we are trusting in Him that we are moving in the direction that He has for us and pray that He may use us in our new place and that we may be able to share His word with our new neighbours.

Thank you all so much for visiting my blog (especially thank you to my regular followers). Our official moving date is in a couple of weeks but I've already packed up most of my craft room (it took me two WHOLE days just to get it into boxes)! Now to tackle the rest of the house! I will be busy packing, cleaning and unpacking again for a while but I will be back as soon as I can!
Thanks for looking!

Tuesday 21 July 2015

ODBDSLC247 - Inspiration

Here is my card:

Elizabeth Whisson, Our Daily Bread Designs, Garden Path, vellum, handmade card, 2 Corinthians 2:15, Fragrance, Circle ornament dies, embossing, no lines colouring, Copics, Flower Box Fillers, Vintage Ephemera

And this is the inspiration image:
When I looked at the inspiration photo I though about a beautiful garden - but not necessarily in window boxes :-) Then I thought of Our Daily Bread Design's stamp Garden Path. I love this stamp - to me it makes we wonder what is beyond that gate - an immense field of flowers, a huge house with lots of window box flowers or a quaint little cottage??
The sentiment that I chose to pair with the image is 2 Corinthians 2:15. What a beautiful verse!

I've stamped the image from Our Daily Bread Designs Garden Path in light coloured ink (Memento Desert Sand) and coloured the image with Copics. This is called no-lines colouring as you cannot see the outline of the stamp when you've finished colouring.

Copics Colour Used
Clouds: C0, C1, C2, C3, W00, W2
Sky: B0000, B000
Tree trunks: E31, E44, E47, E49
Tree leaves: G43, G46, G99
Brickwall: E11, E15, E08, Q1, W2, W4
Gate / Posts: W1, W2, W4, W5
Path: W1, C2, C3, E11, E71
Arch Plants: YG45, G46, G99
Shrubs: YG13, G24, G46, G28
Grass: YG23, YG17, YG67, G94
Flowers and stems: G99, YG67, R89, V05, V09

I've then stamped the verse from Our Daily Bread Designs Fragrance onto vellum using clear ink and embossed using AnnaBelle Stamps Bark coloured EP. The verse is then diecut using ODBD Circle Ornament Dies.

I've added a small dot of glue to attach the vellum and then placed the flower, diecut from ODBD Flower Box Fillers Dies, on top so you cannot see it (as the vellum is see-through). 

I used ODBD Vintage Ephemera Paper Collection to diecut the flower.

For more inspiration for this challenge please visit my talented design team sisters

To see all the projects created for ODBDSLC247 or to join the challenge click here. You have until 8 pm Sunday, 26 July 2015 EDT to join us (or 8 am Monday, 27 July 2015 AWST). By participating in the challenge, you have a chance to win a $15 ODBD Gift Certificate that can be used towards the purchase of stamps in the "stamps column" in the ODBD Store; or to be spotlighted on the ODBD Blog at our next challenge! The random prize winner will be posted on our next challenge post.

Thanks for looking!

Tuesday 14 July 2015

ODBDSLC246 - Sketch

Our Daily Bread Designs challenge this week is a sketch challenge, ODBDSLC246
Here is my card:

Elizabeth Whisson, Our Daily Bread Designs, ODBD, ODBDDT, ODBDSLC246, Sketch, handmade card, The Good Seed, Vintage Ephemera, Recipe Card and Tags, Matting Circles, Flower Box Fillers

And here is the sketch:

I've pretty much followed the sketch but added another layer on the main panel and instead of the bow I used flowers.

I've used the image from Our Daily Bread Designs The Good Seed and coloured with Copics.

Copic colours used
C5, E99, E97, E11
E51, E55
E42, E47, E49
C1, C3, C5, C7
Packet of seeds: E51, G21
Ground: C1, C3, C5, E42, E44, 0
Background: E30 and 0

The sentiment is also from Our Daily Bread Designs The Good Seed and is diecut using ODBD Recipe Card and Tags Dies and matted using ODBD Matting Circles Dies.

Instead of the bow I've added some flowers using ODBD Flower Box Fillers Dies. The DP I've used is ODBD Vintage Ephemera Paper Collection.

I've also added some ribbon from my stash and AnnaBelle Stamps 3 mm sprinkles - toffee and sultana. Most layers have been sponged with Distress Ink Walnut Stain.

For more inspiration for this challenge please visit my talented design team sisters

To see all the projects created for ODBDSLC246 or to join the challenge click here. You have until 8 pm Sunday, 19 July 2015 EDT to join us (or 8 am Monday, 20 July 2015 AWST). By participating in the challenge, you have a chance to win a $15 ODBD Gift Certificate that can be used towards the purchase of stamps in the "stamps column" in the ODBD Store; or to be spotlighted on the ODBD Blog at our next challenge! The random prize winner will be posted on our next challenge post.
The verse that I've used on my card is part of the answer to the parable of the weeds. The parable of the weeds in Matthew 13:24-30 reads:
"Jesus told them another parable:" The kingdom of heaven is like a man who sowed good seed in his field. But while everyone was sleeping, his enemy came and sowed weeds among the wheat, and went away. When the wheat sprouted and formed heads, then the weeds also appeared. "The owner's servants came to him and said, 'Sir, didn't you sow good seed in your field? Where then did the weeds come from?' "'An enemy did this,' he replied. "The servants asked him, 'Do you want us to go and pull them up?' " 'No,' he answered, 'because while you are pulling the weeds, you may root up the wheat with them. Let both grow together until the harvest. At that time I will tell the harvesters: First collect the weeds and tie them in bundles to be burned; then gather the wheat and bring it into my barn.' " "

The parable is then explained in Matthew 13:36-43
"Then he left the crowd and went into the house. His disciples came to him and said, "Explain to us the parable of the weeds in the field." He answered, "The one who sowed the good seed is the Son of Man. The field is the world, and the good seed stands for the sons of the kingdom. The weeds are the sons of the evil one, and the enemy who sows them is the devil. The harvest is the end of the age, and the harvesters are angels. "As the weeds are pulled up and burned in the fire, so it will be at the end of the age. The Son of Man will send out his angels, and they will weed out of his kingdom everything that causes sin and all who do evil. They will throw them into the fiery furnace, where there will be weeping and gnashing of teeth. Then the righteous will shine like the sun in the kingdom of their Father. He who has ears, let him hear." "

Many people don't want to know about hell, they make jokes about it and claim that its "not that bad". But the Bible tells a different story. It is a "fiery furnace, where there will be weeping and gnashing of teeth". There is no escape, those who do not accept Jesus Christ as their Saviour will be spending eternity in hell. Let us focus our lives on Christ, be a shining light for Him and tell all those around us how merciful and gracious God is to send His only Son to save us from our sins, dying on the cross and conquering death by rising again! Jesus lives!
Thanks for looking!

Friday 10 July 2015

Window and Birds

I had fun making this card using Our Daily Bread Designs products. I also tried out a technique that is new to me- camouflaging diecuts - read about it here on Splitcoast Stampers (TLC540 challenge). Here is my card:

Our Daily Bread Designs, ODBD, ODBDDT, Copics, handmade card, Belles Vignes, TLC540, Sweet Christmas Wishes, Spread Your Wings, Welcoming Window dies, Window Shutter and Awning, Birds and Nest, Flower Box Fillers, Elizabeth Whisson

I've stamped the image from Our Daily Bread Designs Belles Vignes onto white card and then diecut the window using ODBD Welcoming Window dies (keep these diecuts). I've then diecut another two outside window frames from plain white card and another four windows (inside part) from plain white card.

To make the inside of my house I stamped the image from Our Daily Bread Designs Sweet Christmas Wishes onto white card and coloured with pencils. This is also diecut using the outside window frame. You then layer up all the layers. image first, then the plain white diecuts and lastly the diecuts you first cut so that it looks like the Belles Vignes image continues onto the window. Here is a photo from the side:


I've then added the awning using ODBD Window Shutter and Awning dies. The birds and nest are stamped using Our Daily Bread Designs Spread Your Wings and diecut using ODBD Birds and Nest dies and the flowers are from ODBD Flower Box Fillers Dies

Thanks for looking!

Belles Vignes


Elizabeth Whisson, Our Daily Bread Designs, CC537, Belles Vignes, Butterfly and Bugs, Good Man, Distress Ink

I've used Distress Inks Ripe Persimmon, Mowed Lawn and Wild Honey. The image is from Our Daily Bread Designs Belles Vignes and is stamped using clear ink and then clear embossed. 


The butterflies are stamped using Our Daily Bread Designs Butterfly and Bugs and diecut using the ODBD Butterfly and Bugs dies. I've added a little glossy accents to the middle of each butterfly.

Thanks for looking!

Thursday 9 July 2015

Fragrance

Our Daily Bread Designs has some awesome releases in July! This Fragrance stamp set is one of them.

Elizabeth Whisson, Our Daily Bread Designs, ODBD, ODBDDT, Fragrance, Elegant Ovals, Welcoming Windows dies, Shabby Rose Paper Collection, handmade card, flower, Copics

I have made my card by stamping the image from Our Daily Bread Designs Fragrance onto white card. I then stamped it a second time on another piece of white card and coloured this one in with Copics. Copic colours used include: B91, B95, B99, R12, YR14, G20, G24 and G28.

I've then diecut the one that I coloured using ODBD Custom Welcoming Window Dies and used the "offcuts" of the window (the squares) and popped them up on foam tape on top of the uncoloured image (the first one I stamped). Here is a close up.


I have then stamped one of the sentiments from the Our Daily Bread Designs Fragrance stamp set and diecut it using ODBD Custom Elegant Ovals dies. The DP on the left side is ODBD Shabby Rose Paper Collection.

I actually ended up adding some small blue "sprinkles" (half glass spheres) on the top right of my card to break up the white a little (but I did this after it was photographed).

Thanks for looking!

ODBDSLC245 - Colour 2

I've made another card for this week's colour challenge at Our Daily Bread Designs. You can see the first card I made here. Here is my second card:

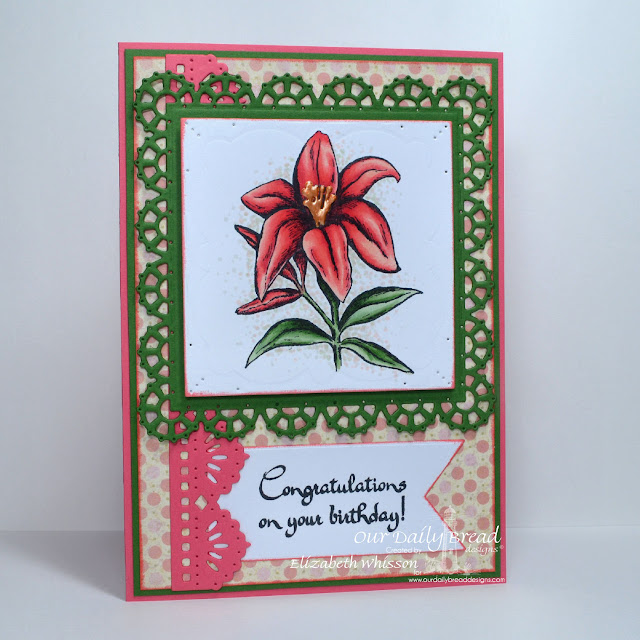
Elizabeth Whisson, Lily, Our Daily Bread Designs, Life is a Gift, Pennant, Beautiful Borders, Layered Lacey Squares, Blushing Rose Paper Collection, ODBD, ODBDDT, ODBDSLC245, Colour challenge, Copics, liquid pearls, birthday, handmade card

I have stamped the image, Our Daily Bread Designs Lily Single and coloured wtih Copic markers.

Copic Colours Used
Flower: R11, R22, R35, R37
Leaves: YG61, YG63, YG67
Background: W1, W2, R11, YG61

The image is then matted with a piece I have diecut using ODBD Layered Lacey Squares Dies. I've made the sentiment using Our Daily Bread Designs Life is a Gift and ODBD Pennants Dies. The border is from ODBD Beautiful Borders Dies and the DP I have used is ODBD Blushing Rose Paper Collection.

I've then added some liquid pearls (canteloupe) to the flower.


For more inspiration for this challenge please visit my talented design team sisters
(if you haven't already):

To see all the projects created for ODBDSLC245 or to join the challenge click here. You have until 8 pm Sunday, 12 July 2015 EDT to join us (or 8 am Monday, 13 July 2015 AWST). By participating in the challenge, you have a chance to win a $15 ODBD Gift Certificate that can be used towards the purchase of stamps in the "stamps column" in the ODBD Store; or to be spotlighted on the ODBD Blog at our next challenge! The random prize winner will be posted on our next challenge post.
 
Thanks for looking!

Tuesday 7 July 2015

ODBDSLC245 - Colour

Elizabeth Whisson, Our Daily Bread Designs, ODBD, ODBDDT, ODBDSLC245, Special Girl, Copics, Sunburst background dies, Sparkling Stars, handmade card, little girl, birthday, castle

And this is the colour palette:

I've stamped the image from Our Daily Bread Designs Special Girl onto X-Press It blending card and coloured with Copic markers.

Copics Marker Colours Used
Clouds: C0, C1, C2, C3, W2, B60
Sky: B0000, B000
Hills: YG41, YG45, YG67 and C1
Grass: YG61, YG45, YG67, YG94 and YG99 (and white gel pen)
Castle: R11, R22, R35, C4
Path/Door/Flags: R00, R11, R21

For the background piece I diecut some card using the ODBD Sunburst Background die and then sponged with Distress Ink Abandoned Coral. 

The sentiment is also from Our Daily Bread Designs Special Girl and then I've diecut it using ODBD Sparkling Stars dies.

Lastly I've added some Stickles Cotton Candy to the flags to give it a little sparkle.

For more inspiration for this challenge please visit my talented design team sisters 

To see all the projects created for ODBDSLC245 or to join the challenge click here. You have until 8 pm Sunday, 12 July 2015 EDT to join us (or 8 am Monday, 13 July 2015 AWST). By participating in the challenge, you have a chance to win a $15 ODBD Gift Certificate that can be used towards the purchase of stamps in the "stamps column" in the ODBD Store; or to be spotlighted on the ODBD Blog at our next challenge! The random prize winner will be posted on our next challenge post.
 
Thanks for looking!

Wednesday 1 July 2015

ODBD Anything Goes

The current challenge at Our Daily Bread Designs, ODBDSLC244, is Anything Goes with ODBD. You can see the first card I made for this challenge here. I've made two more cards and you can see them below.


For my first card I used Bazzill heavyweight marshmallow cardstock as my cardbase. I then diecut DCWV - Sky's the Limit using the new ODBD Sunburst Background die and sponged using Distress Ink Scattered Straw. I've then diecut the sun using the same set from the same DP and popped it up on foam tape. The Hello! is diecut using ODBD Hello die from the same DP again. Nice and easy :-)


For my second card I used Bazzill and American Crafts cardstock for the base and matting layer. I've then diecut a piece from the ODBD Vintage Ephemera Paper Collection using the ODBD Sunburst background die and sponged with Distress Ink Frayed Burlap. Some of the paper in the Vintage Ephemera Collection coordinates with the ODBD Custom dies. The pennats I've used on my card are included in the Vintage Ephemera Collection and I've diecut them using ODBD Pennants dies (they fit perfectly). I've stamped the verse from Our Daily Bread Designs Good Man onto white cardstock and diecut using ODBD Antique Labels and Border dies.

For more inspiration for this challenge please visit my talented design team sisters 
(if you haven't already):

To see all the projects created for ODBDSLC244 or to join the challenge click here. You have until 8 pm Sunday, 5 July 2015 EDT to join us (or 8 am Monday, 6 July 2015 AWST). By participating in the challenge, you have a chance to win a $15 ODBD Gift Certificate that can be used towards the purchase of stamps in the "stamps column" in the ODBD Store; or to be spotlighted on the ODBD Blog at our next challenge! The random prize winner will be posted on our next challenge post.

Thanks for looking!

Monday 29 June 2015

Gladioli

I made a second card for the PowerPoppy Pencil Me in challenge (to use pencils on your project). You can see the first card I made here. This is my second card:
Elizabeth Whisson, flowers, PowerPoppy, Power Poppy, Gladioli, Lavender sentiment, Canson Mi-Teintes, Prismacolor pencils, handmade card

For this card I printed the PowerPoppy Gladioli digi stamp onto Canson Mi-Teintes card and coloured with my prismacolor pencils. The sentiment is hand stamped using PowerPoppy Lavender clear stamp set. The DP is from My Minds Eye - Everyday Tango and the cardstock is Bazzill heavyweight. 

I am entering this card in the PowerPoppy Pencil Me In challenge.
I am also entering this card in the Scrapping 4 Fun Challenges - Challenge #45 - Anything Goes
 
Thanks for looking!
Related Posts Plugin for WordPress, Blogger...