"The grass withers, the flower fades, But the word of our God stands forever." Isaiah 40:8

Sunday 26 May 2013

Copic Journal - Skin Colours

I'm enjoying following Copic Oz's posts on the Copic Technique Journal (well - I enjoy reading / following any posts that increase my copic knowledge and skills :-) ). Their latest post is about skin colours (view it here). The post also contains a great template that you can use.

Skin colours are something that I struggle with, especially the darker colours. So I started off trying out the colours that Kate used on the Copic Oz site. Kate's images are much better than mine... here was my attempt:
Elizabeth Whisson, copic journal, copic colours, copic colors, skin colours, skin colors, colour combinations, color combinations
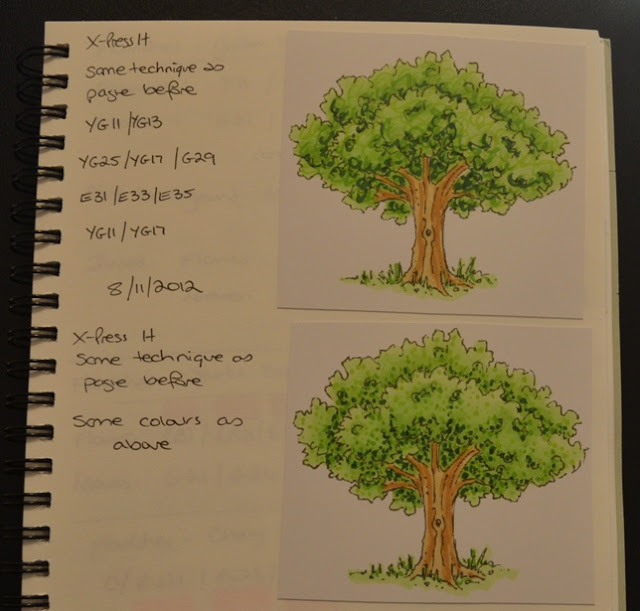
This is the template that you can get from the Copic Oz site. The bottom right one I just penciled in the colours she used... I am missing the E95 from my collection so will add this at a later date.

I really like the template, the pictures are not too far apart so when I cut the A4 page in half, I could fit a good number of skin combinations on my journal page.

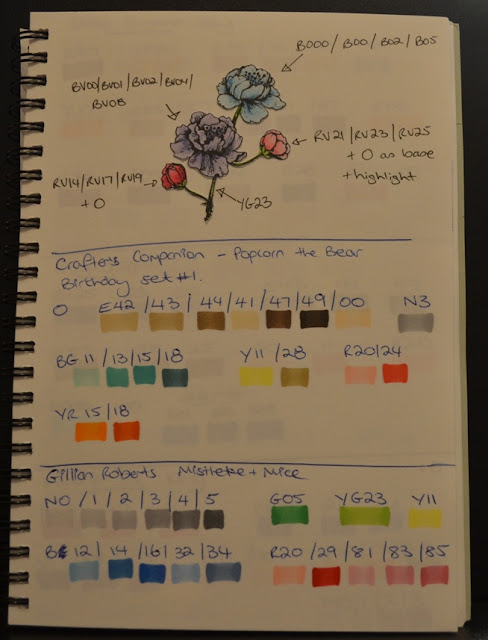
I continued with the template leaving room to add more combinations at later dates:
Elizabeth Whisson, copic journal, copic colours, copic colors, skin colours, skin colors, colour combinations, color combinations

Elizabeth Whisson, copic journal, copic colours, copic colors, skin colours, skin colors, colour combinations, color combinations

I then used another template from the Copic Colouring Guide Level 3: People by Colleen Schaan and Marianne Walker (a fantastic book) to get skin colours from a "guys" perspective :-)
Elizabeth Whisson, copic journal, copic colours, copic colors, skin colours, skin colors, colour combinations, color combinations

Elizabeth Whisson, copic journal, copic colours, copic colors, skin colours, skin colors, colour combinations, color combinations

While I do like the image on this template, I found that the images were slightly too far apart, so I ended up cutting each image out and sticking it on my page. Definitely looks uglier (than leaving them on the one, flat page) but I'd rather sacrifice the "looks" of my journal in exchange for fitting more colour combinations in my journal.

I haven't had much time to play with my copics in these last 2 weeks... so that's about as far as I got with the skin combinations. But I'm glad that I have some "blank" templates in my journal so it will be easy to add more later on. I'm also glad I did spend a bit of time adding these skin combinations to my journal. As I said above, skin colours are something I struggle with and having these in my journal will make colouring my pictures that little bit easier.

It may be a bit hard to see from the photos but I've taped "extra" pages (the templates were good to use here) into my journal so they become "flip-out" pages. That way I have more room to add even more combinations.

Entering this post in the Copic Oz Copic Technique Journal #2: Skin Swatches to win a free journal!

See more of my copic colour combinations and techniques:
Colour combinations
Colourless Blender techniques
Hair Colours
More colour combinations
Copic combinations added to Journal in 2014

I have also started a Copic page - you can view it here

Sunday 12 May 2013

Copic Colour / Technique Journal

I discovered copics only in August 2012 and am so glad that I did. They are fantastic markers and some people can colour just beautifully with them (I hope the more I practice the better I get!)

Since they come in such a range of colours (and I do have a few now) I have found it hard to keep track of what colours I used for which pictures and what colour combinations I like the best. I found myself (not sure if the word is wasting time, learning or playing :-) ) with my copics for at least 30 mins before I got around to actually colouring my picture because it took me that long to go through my copics and find the best colour combinations I liked for the particular picture I was colouring at the time.

So I started a little A5 size book just for my copics where I tried to start keeping track of colours and techniques that I was learning / discovering. Ideally copics need to be used on special card, such as X-Press It blending paper, however, I couldn't find a "book" with just this paper and I was too lazy to go bind my own! So I just bought a plain art diary with 110 gsm card. The copics do bleed through the paper so I either use a scrap piece of card behind the page I'm working on or complete my picture / technique on X-Press It blending card first, cut it out and stick it in my book.

Imagine my joy when I discovered that X-Press Graph-X have now released a X-Press It Blending Journal - which is a book full of the X-Press It blending card! Yay! Also, on the Copic Oz blog a Copic Blending Template (get them from this site) has also been released.

I have found the templates a fantastic idea. In my Copic book I was just either writing the copic colours down and making a coloured mark below the "number" or stamping a picture, colouring it in and writing down what the colours were. But I have found the template to be one step better, because I can still stamp pictures and colour them in but the template also allows me to show the blend between the colours I used and you can also see the actual colour themselves.

Here are some pictures of my journal before I started using the template:

As you can see the copics don't blend very well on this plain 110 gsm card.
Stamps: Sizzix and Hero Arts Stamp and Die cut set #657852


This tree is one of the digital images you get on a CD when you buy Annie's Attic (Paper Crafts) Copic Colouring Guide Level 2: Nature by Colleen Schaan and Marianne Walker. The colours that I have used are not the same as the ones they show you in the book as part of the tutorial.


Stamp: Flourishes "Cherry Blossoms"  


And now... this is some of what I have created with the Copic Blending Template:
Elizabeth Whisson, copic journal, copic, copic colours, Flourishes, Bloomin Aussie Florals, YG, R
Stamp: Sturt's Desert Rose from Flourishes "Bloomin Aussie Florals"
I find this sooo much easier to see the difference between the colour combinations and am able to more easily pick which colours I want to use for my pictures.


Elizabeth Whisson, copic journal, copic, copic colours, Flourishes, Bloomin Aussie Florals, YG, R, G


As you can see I have left room for more colour combinations.


Elizabeth Whisson, copic journal, copic, copic colours, E, brown
Stamp: Part of the tree from the Penny Black "Teddy & Company" set


Elizabeth Whisson, copic journal, copic, copic colours, Y, YR, yellow, ornage, Annabelle Stamps
Stamp: AnnaBelle Stamps "Ballerina Rose"

This is only the beginning :-)

Entering this post (showing my use of the copic blending template) in the Copic Oz: Technique Journal #1 Colour Swatches competition to win a free X-Press It Blending Journal!

See more of my copic colour combinations and techniques:
Skin Colours
Colourless Blender techniques
Hair Colours
More colour combinations
Copic combinations added to Journal in 2014

I have also started a Copic page - you can view it here

Party Time

Am having a get together soon so I thought I would handmake my invitations. Couple of photos of what they turned out like.

Thank you to one of my best friends for tying all of the buttons! You did a fantastic job and you saved me sooo much time :-)


Some of the materials include: Sizzix/Tim Holtz Bigz Die "Elegant Flourishes" and "Flower Layers #7", Cherry Lynn Designs "Tags 1", ribbon from my stash, DCWV "The Stardust Stack" cardstock, Creative Plain cardstock, DCWV "The Homespun Stack" cardstock, Beutron craft buttons.

Craft Time

I really enjoy making art and craft things with my kids. It's lovely to see their faces light up when I ask if they would like to make something. For Mother's Day we set about to make my Mum some scented butterflies (and other shapes) to make either a room or clothes smell nice.

We made some salt dough together (recipe out of my craft book that I have) and then the kids enjoyed cutting out different shapes. We had to wait a LONG time (I'm sure 4 hours seems like days for kids) for the shapes to dry in the oven and then cool down. Both my 2 and 4 and a half year old had immense fun painting not only the shapes but the lawn, table and themselves as well!

Once dry, they helped add some essential oil to the unpainted little square we left on the back of the shapes. Threaded some ribbon through the holes and wrapped up our gifts.
The pictures below are of the "extra" shapes that we made - for them to hang up in their rooms.


Mother's Day - card 2

Since I'm married I technically now have two mother's :-) So this is the second Mother's Day card I made.


Materials: Copics (BG01, BG05, BG09, Y13, YR15), Pebbles Pearlescent chalks (Jewel Tones), Memento Tuxedo Black ink, Papercraft rhinestones, ribbon from my stash, Spellbinders nestabilities Lacy Squares, X-Press It blending card, DCWV The painted petals stack, Merci patterend paper, Creative Plain cardstock, AnnaBelle Stamps Squared Posies
Related Posts Plugin for WordPress, Blogger...